React入門
2024-2025 Shunsuke Watanabe
このチュートリアルについて
このチュートリアルはReactでSPA(Single Page Application)を構築する際の基礎に触れてもらうことを目的としています。twitchまたはYoutubeで配信します、配信時間は2時間前後です。
Twitch → https://www.twitch.tv/shun__suke__
Youtube → https://www.youtube.com/@Captain_Emo
🧭 配信予定 → https://hands-on.connpass.com/
discord → https://discord.gg/3havwjWGsw
bluesky → https://bsky.app/profile/craftgear.bsky.social
📝 blog → https://craftgear.github.io/posts/
このチュートリアルを終えたあとの演習として、ハンズオンシリーズがあります。→ ハンズオン一覧
1. 開発環境の準備
対象環境
- macOS
- Node.js 20〜
- LinuxやWindowsの方は自分でnodeとnpmをインストールできれば後は同じです
Node.js
-
nodeとpnpmのバージョン確認
Terminal window ❯ node -vv20.13.1❯ pnpm -v10.5.1 -
Node.jsのインストールにはfnmがおすすめ → fnm
-
pnpmのインストール方法 → pnpm公式サイト
コードエディタ
- VisualStudio Code, neovim, emacsなどプログラミング支援機能が使えるもの
新しいReactプロジェクトの作成
-
Viteを使って初期化
Terminal window pnpm create vitecd react-hands-onpnpm ipnpm approve-builds -
プロジェクト名を入力し、
ReactとTypeScript + SWCを選択してください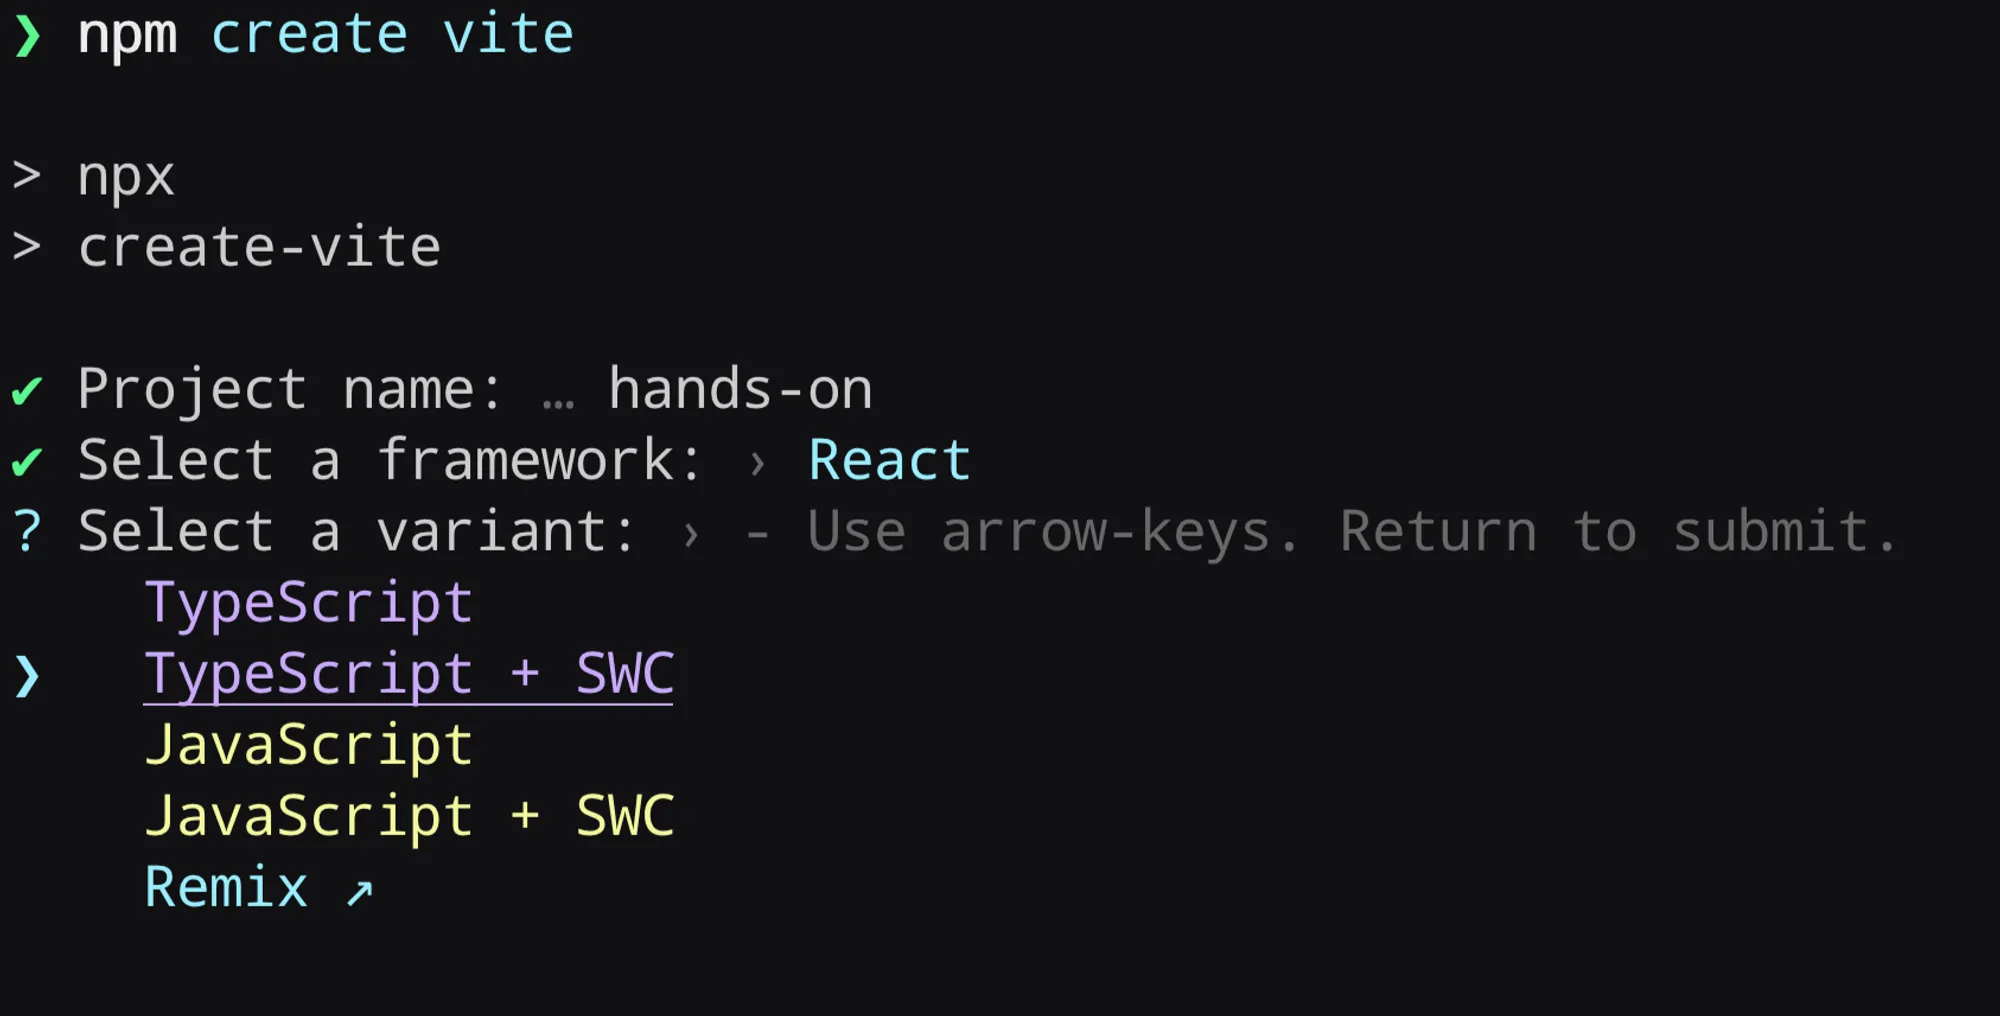
-
Linter
- インストール済み
-
コードフォーマッターのインストール
pnpm add -D prettier -
pnpm devで開発用サーバ起動- http://localhost:5173 をブラウザで開く
2. コンポーネント作成
コンポーネントとJSX
-
Viteアイコンをコンポーネントにする
const ViteIcon = () => {return (<a href="https://vitejs.dev" target="_blank"><img src={viteLogo} className="logo" alt="Vite logo" /></a>);};- Reactアイコンをコンポーネントにする
-
Viteアイコンコンポーネントを別ファイルにする
- Reactアイコンコンポーネントを別ファイルにする
-
Viteアイコンに
<div>アイコンをクリックするとViteのサイトを開きます</div>というタグを追加する- Reactアイコンに
<div>アイコンをクリックするとReactのサイトを開きます</div>というタグを追加する
- Reactアイコンに
-
componentsディレクトリを作成し、ViteIcon.tsxとReactIcon.tsxをその中に移す
コンポーネント
- コンポーネント = 関数
- 関数名は大文字で始める
- ファイルの拡張子は
tsx - 要素を一つだけ返す
- 複数行のjsxは ( ) でくくる
- 別ファイルのコンポーネントはexportする
JSX
- HTMLタグではない
- https://babeljs.io/repl
- jsxの特殊な属性
- class → className
- for → htmlFor
- key
- ref
- fragment
- jsx内にjavascriptを書くには
{}を使う
コンポーネントのレンダリングとDOMレンダリング
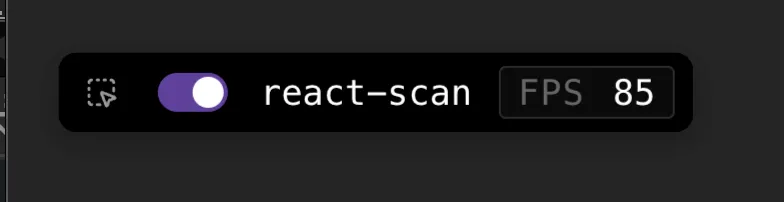
react-scanのセットアップ
-
index.htmlを開き、headタグ内に以下のスクリプトを追加する<script src="https://unpkg.com/react-scan/dist/auto.global.js"></script>
React-Scan を使ったReactレンダリングの可視化
- ページをリロードすると左上にreact-scanのウィジェットが表示される
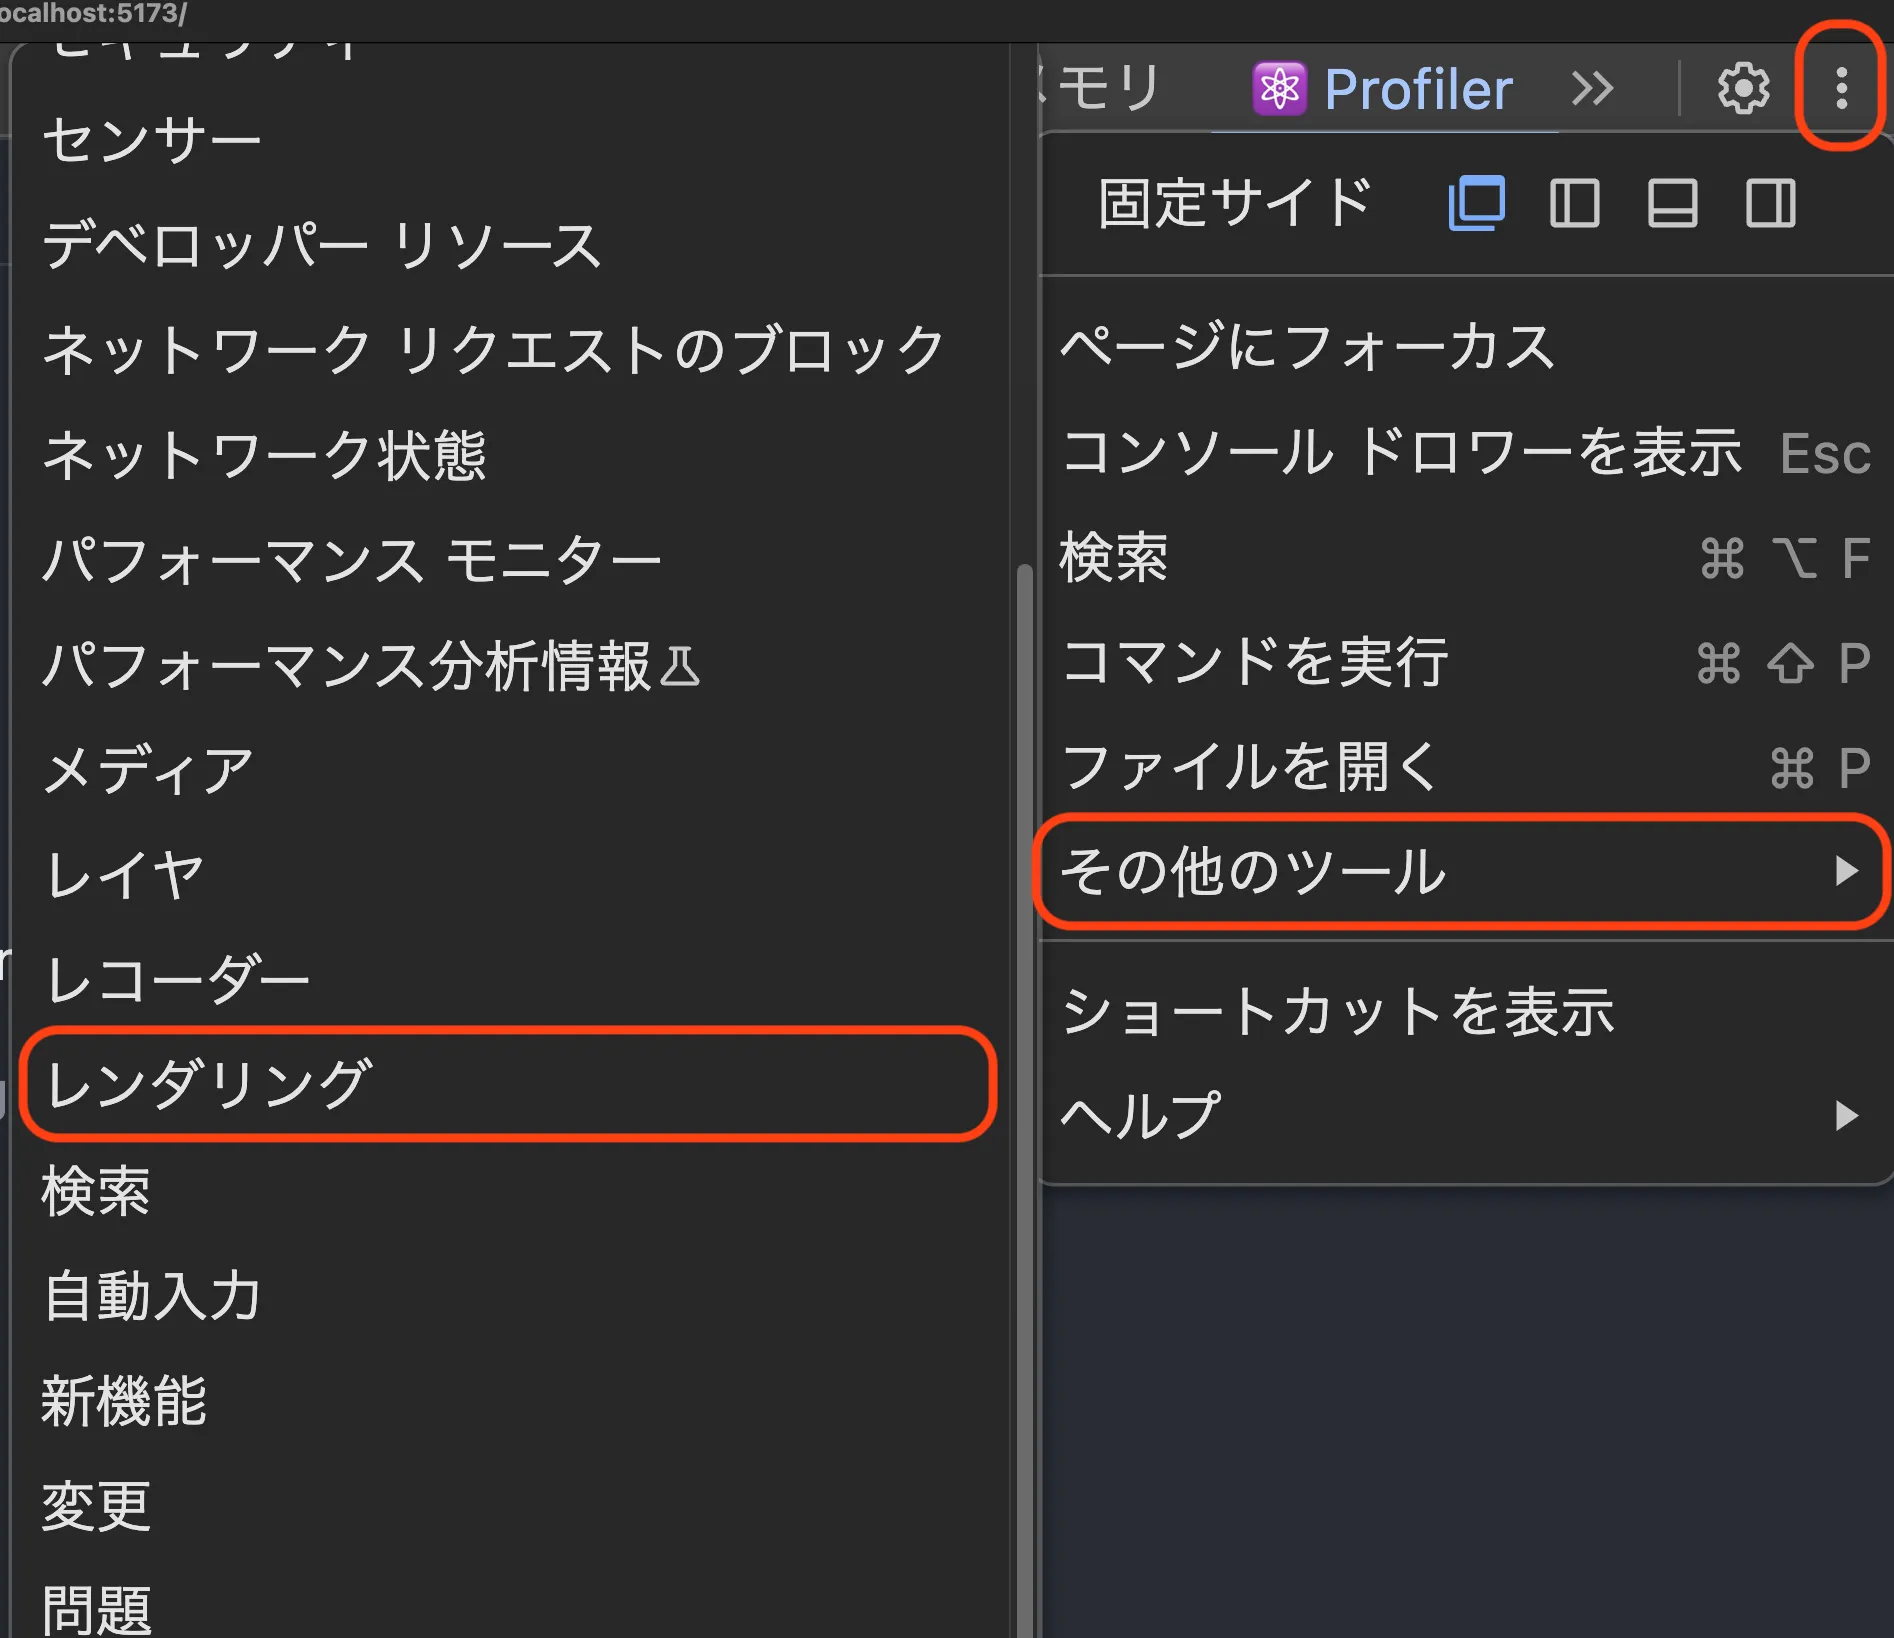
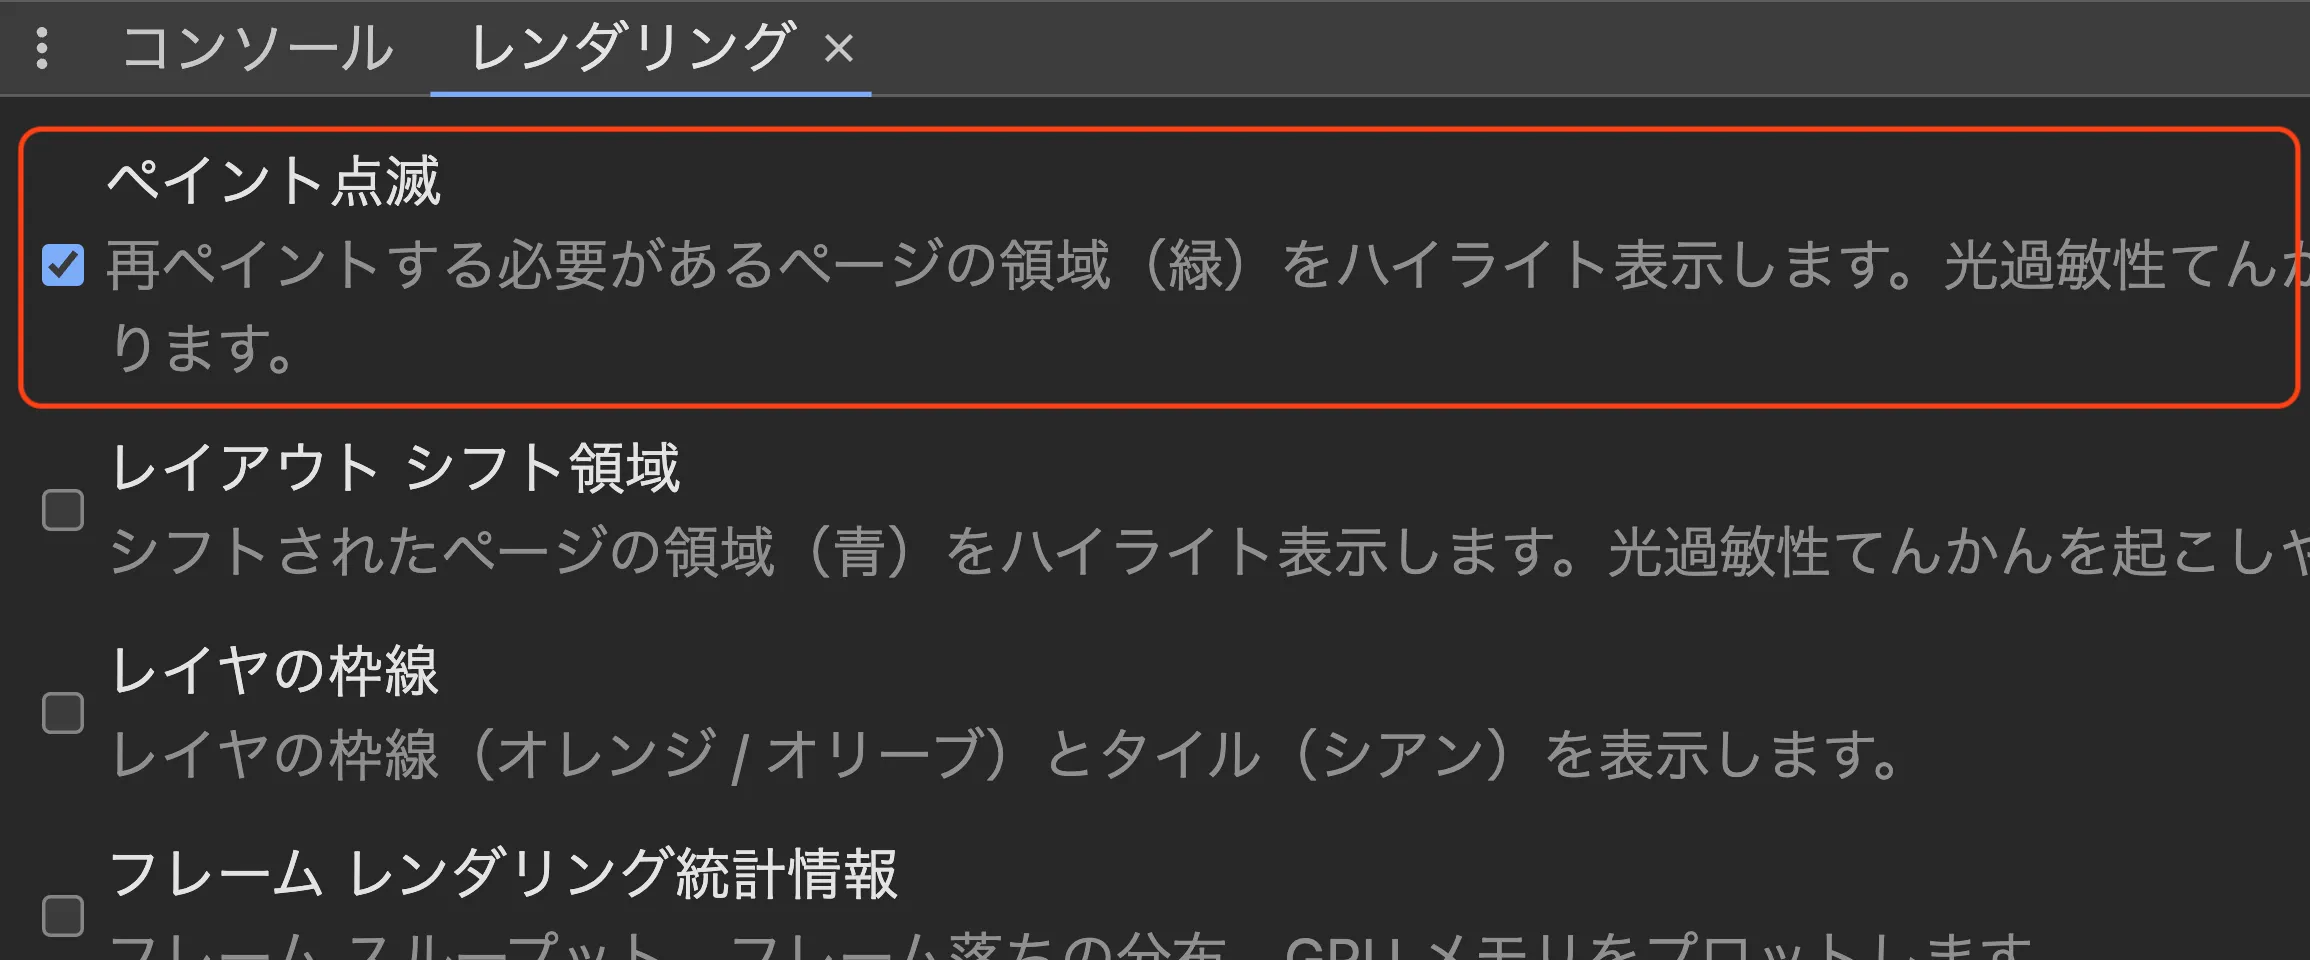
Chrome DevTools を使った DOMレンダリングの可視化
コンポーネントの属性
-
「こんにちは」と出力する
Greetingコンポーネントを作り、App.tsxで表示する。export const Greeting = () => {return <h1>こんにちは</h1>} -
<Greeting name="React" />で名前を受け取り、「こんにちは React」と出力するように変更するtype Props = {name: string;};export const Greeting = (props: Props) => {return <h1>こんにちは {props.name}</h1>} -
<Greeting />コンポーネントのタグを開き、子要素を追加するimport type { PropsWithChildren } from 'react';type Props = {name: string;};export const Greeting = (props: PropsWithChildren<Props>) => {return (<><h1>こんにちは {props.name}</h1>{props.children}</>);}; -
props を destructuring する
-
名前の配列を元に複数のコンポーネントを作成する
export const Greeting = ({ names, children }: PropsWithChildren<Props>) => {return (<>{names.map((name) => (<h1 key={name}>こんにちは {name}</h1>))}{children}</>);};
Props
- タグの属性に任意の値を渡すとpropsとして受け取れる
- propsが変わるとコンポーネントが再レンダリングされる
Children
- コンポーネントの子要素が
childrenとしてpropsに渡される - 型情報の追加には
PropsWithChildrenユーティリティタイプを使う
Key
- 同じコンポーネントを動的に複数生成するとき key がないとコンソールに警告が出る
- keyは親要素ごとにユニークであればいい
- propsには含まれない
- keyが変わるとコンポーネントが再マウントされる
補足
class HogeHoge extends React.Componentという書式について- コンポーネント内でコンポーネントを定義するのは避ける
まとめ
UI = f( props )- jsx ≠ HTML
- コンポーネントのレンダリング ≠ DOMのレンダリング
3. スタイル
CSS適用方法4つ
- グローバルCSS
- 通常のスタイルシートと同じ
- CSS Module
- コンポーネントごとにCSSクラスをスコープ化できる
- インラインStyle
- コンポーネントに
style属性を追加する
- コンポーネントに
- CSS-in-JS
- jsx内でcssをかけるようにする仕組み
- emotion
- emotionベースのコンポーネントライブラリ
- ChakraUI / MUI / Antd / Mantine
React@18以降の状況
- CSS-in-JSはReact18以降で描画が遅くなる
- zero runtime CSS-in-JS
- vanilla-extract https://vanilla-extract.style/
- linaria https://linaria.dev/
- panda css https://panda-css.com/
- Griffel https://griffel.js.org/
- Tailwind CSS ベースのコンポーネントライブラリ
- shadcn/ui https://ui.shadcn.com/
- Flowbite React https://flowbite-react.com/
- DaisyUI https://daisyui.com/
- HyperUI https://www.hyperui.dev/
- Preline https://preline.co/examples.html
DaisyUI
-
Tailwind CSSのインストール
pnpm add -D tailwindcss @tailwindcss/vite @tailwindcss/typography prettier-plugin-tailwindcss -
vite.config.tsに tailwindcssプラグインを追加import { defineConfig } from 'vite'import react from '@vitejs/plugin-react-swc'import tailwindcss from '@tailwindcss/vite'// https://vitejs.dev/config/export default defineConfig({plugins: [react(), tailwindcss()],}) -
.prettierrcというファイルを作り、prettier-plugin-tailwindcssを追加{"plugins": ["prettier-plugin-tailwindcss"],} -
index.cssの中身を消し、Tailwind CSSを読み込み@import "tailwindcss";@plugin "@tailwindcss/typography"; -
index.htmlの<head>タグ内にproseクラスを追加<body class="prose max-w-full">...</body> -
DaisyUIのインストール
pnpm add -D daisyui@latest -
index.cssで DaisyUIプラグインを読み込み@import "tailwindcss";@plugin "@tailwindcss/typography";@plugin "daisyui" {themes: cupcake --default;} -
開発サーバーを再起動
-
カウンターボタンの見た目を変更する
- daisyuiを使い、ボタンの見た目を変更する
<buttonclassName="btn btn-outline btn-primary"onClick={() => setCount((count) => count + 1)}>count is {count}</button>
- tailwindcssを使い、文字サイズとサイズを変更する
<buttonclassName="text-2xl w-1/2"onClick={() => setCount((count) => count + 1)}>count is {count}</button>
- daisyuiを使い、ボタンの見た目を変更する
4. フック
- Reactが標準で提供するフック https://react.dev/reference/react/hooks
- とりあえず覚えると良いもの
- useState
- useRef
- useEffect
- ある時点での値を記憶しておく仕組み
- 覚える値の種類と値の更新方法の違いで色々種類がある
- レンダリング時に毎回同じフックが同じ順番で呼び出される必要がある
- if 文で分岐はできない
useState
- react-scanでレンダリング表示を有効にする
<div className="card">...</div>の部分をコピーして、<Counter/>コンポーネントを作成するsetCount((count) => count+1)をsetCount(count+1)に変更しておく。
import { useState } from 'react';
export const Counter = () => { const [count, setCount] = useState(0)
return ( <div className="card"> <button onClick={() => setCount(count + 1)}> count is {count} </button> <p> Edit <code>src/App.jsx</code> and save to test HMR </p> </div> )}-
App.tsxで<Counter />を表示する -
react-scanを有効にし、
App.tsxのカウンターを更新したときと、<Counter />コンポーネントを更新したときのレンダリングの違いを確認する -
<Counter />をコピーして<ObjectCounter />を作成し、useStateで保存する値をオブジェクトに変更する。
import { useState } from 'react';
export const ObjectCounter = () => { const [state, setState] = useState({ count: 0 });
return ( <div className="card"> <button className="btn btn-primary text-xl" onClick={() => { state.count = state.count + 1; setState(state); }} > count is {state.count} </button> <p> Edit <code>src/App.tsx</code> and save to test HMR </p> </div> );};- オブジェクト内の値を直に書き換えてもコンポーネントが再レンダリングされないことを確認する。
onClickで新規オブジェクトを作成してsetStateするとコンポーネントが再レンダリングされることを確認する
- previousValueを使って振る舞いの違いを確認する
- setCount(count+1)を2回呼んでも2ずつ増えないことを確認する
- previousValueを使って2ずつ増えるように変更する
useStateのまとめ
- コンポーネントの内部状態を記憶しておくためのフック
const [value, setValue] = useState(initialValue)setValueを使って値を変更するとコンポーネントがレンダリングされる- オブジェクト、配列、Map/Set などの参照を状態として持つ場合は、新しい値を作ってsetする必要がある
- previous value
- setHoge(hoge + 1) と setHoge(prev ⇒ prev + 1) の違い
useRef + useEffect
<Counter />コンポーネントのボタンにrefを使ってフォーカスを当てる- ページ表示時にボタンまでスクロールするように変更する
- クリーンアップ関数の振る舞いを確認する
useRefのまとめ
- useStateと同じく値を保存しておくためのフック
- ただし値を変更したときにコンポーネントが再レンダリングされない
- ほとんどの場合、DOMへアクセスするための参照を得るのに使う
- jsxのref属性として渡すと自動でDOMがref.currentでアクセスできるようになる
- useEffectとセットで使うことが多い
- createRef
- クラスコンポーネント、コンポーネント外、動的にrefを作りたい場合
- forwardRef
- React@18まで 自作コンポーネントにrefを渡すときに必要
- React@19以降 不要
useEffectのまとめ
- 関数を自動で実行するフック
- 依存配列
- 覚えた関数を実行するタイミングが決まっている
- コンポーネントのレンダリング ← useStateその他のフック
- DOM updated (ref attached)
- DOM painting
(2回目以降) useEffect cleanupuseEffect
- 用途
- DOM操作
- ref.current?.focus()
- ref.current?.scrollIntoView()
- document.title = “new title”
- window.addEventListener(’resize’, () ⇒ console.log(window.clientWidth))
- httpリクエスト
- ブラウザーAPIの呼び出し
- DOM操作
- 戻り値で関数を返すと、4のuseEffect cleanupで実行される
- イベントハンドラの登録解除
- 深い話 https://overreacted.io/a-complete-guide-to-useeffect/
覚える値の種類と値の更新方法の組み合わせ
| フック | 覚える値 | 更新方法 | 再レンダリング |
|---|---|---|---|
useState | 任意の値 | 関数呼び出し | Yes |
useRef | 任意の値(主にDOM) | 代入 | No |
useEffect | 関数 | 依存配列の値の変更 | Yes |
useReducer | 任意の値 | 関数呼び出し | Yes |
useMemo | 任意の値 | 依存配列の値の変更 | Yes |
useCallback | 関数 | 依存配列の値の変更 | Yes |
useLayoutEffect | 関数 | 依存配列の値の変更 | Yes |
サードパーティ製のカスタムフック
https://github.com/streamich/react-use
補足
useReducer
const [state, dispatch] = useReducer(reducer, initialState)useStateよりも複雑な状態の管理に適している- 自分で定義する必要があるもの
- reducer関数
- 初期状態
- アクション
setStateではなくdispatch(someAction)で値を変更する<Counter />コンポーネントをコピーして、<CounterWithReducer />を作り、useStateをuseReducerで置き換える
useMemo / useCallback (& React.memo)
- React@17以降であれば、React Compiler導入で(ある程度)考慮不要
- https://react.dev/blog/2024/10/21/react-compiler-beta-release
以前の内容
- パフォーマンス最適化
- useMemoの用途
- 値のメモ化
- React.memoでメモ化した子コンポーネントのpropsに値を渡す場合
- 時間のかかる計算処理の結果を覚えておく
- 値のメモ化
- useCallbackの用途
- 関数のメモ化
- React.memoでメモ化した子コンポーネントのpropsに関数を渡す場合
- useEffectの依存配列に関数を渡したい場合
- 関数のメモ化
<Note />をReact.memo()を使ってメモ化し、再レンダリングされないことを確認する<Counter />から<Note />にconst now = Date.now()を渡し、再レンダリングされるのを確認するuseMemoを使い、依存配列がない場合、空の依存配列がある場合、別のステートで再レンダリングされた場合で違いを確認する。const handleClick = () => setState(counter + 1)を<Note />コンポーネントに渡し、再レンダリングされるのを確認する。useCallbackを使い、依存配列がない場合、空の依存配列がある場合、別のステートで再レンダリングされた場合で<Note/>コンポーネントの再レンダリングを確認する。const handleClick = () => setState(counter + 1)を prevValue を使って書き換え、依存配列が空の場合にも再レンダリングが起きないことを確認する。
useLayoutEffect
- 2と3の間で呼び出される
- コンポーネントのレンダリング ← useStateその他のフック
- DOM updated (ref attached)
(2回目以降) useLayoutEffect cleanupuseLayoutEffect
- DOM painting
- (2回目以降) useEffect cleanup
- useEffect
- DOM paintingをブロックするので時間のかかる処理は書かない
- useEffectでやると画面がちらつく処理など
- テーブルヘッダの幅変更
- ResizeObserver/MutationObserverの設定
5. ページルーティング
- TanStack Router
- react-router
- wouter
-
TanStack Routerをインストール
Terminal window pnpm add @tanstack/react-router; pnpm add -D @tanstack/router-plugin @tanstack/router-devtools @tanstack/eslint-plugin-router -
vite.config.tsにTanStack Routerプラグインの設定を追加import { defineConfig } from "vite";import react from "@vitejs/plugin-react-swc";import { tanstackRouter } from "@tanstack/router-plugin/vite";// https://vite.dev/config/export default defineConfig({plugins: [react(),tanstackRouter()],}); -
src/routes/__root.tsxファイルを作成する -
pnpm devを実行 ← ここ重要 -
App.tsxの中身をsrc/routes/index.tsxとして切り出す -
新しいページを作成する
src/routes/todos.tsx -
App.tsxでルーターを読み込むimport "./App.css";import { RouterProvider, createRouter } from "@tanstack/react-router";import { routeTree } from "./routeTree.gen"; // 自動生成されるファイルconst router = createRouter({ routeTree });declare module "@tanstack/react-router" {interface Register {router: typeof router;}}function App() {return (<RouterProvider router={router} />);}export default App; -
src/routes/__root.tsxにナビゲーションを追加し、ルートを切り替えるとカウンターがリセットされることを確認する
...
<div className="navbar flex justify-around w-full"> <Link className="btn btn-ghost" to="/"> Home </Link> <Link className="btn btn-ghost" to="/todos"> Todos </Link></div>
...6. アプリケーションステート
- Tanstack Store
- redux toolkit
- zustand
- recoil
- jotai
- nanostate
TanStack Store
- まだAlpha版
- TanStackシリーズ内部で使われているライブラリ
- セットアップ不要
- useStateと同じ使用感
- reselect、useSelectorといったメモ化処理が不要
-
インストール
pnpm add @tanstack/react-store -
src/state/counter.tsファイルを作成し、counterステートを定義するimport { Store } from "@tanstack/react-store";export const counterStore = new Store({counter: 0,}); -
<Counter />コンポーネントをコピーして<CounterWithStore/>コンポーネントを作り、useStateをuseStoreで置き換える。import {useState,} from 'react';import { useStore } from "@tanstack/react-store";import { counterStore } from "../state/counter";export const CounterWithStore = () => {const [count, setCount] = useState(0);const count = useStore(counterStore, (store) => store["counter"]);const handleClick = () => {// setCount(count + 1);setCount((prevCount) => prevCount + 1);counterStore.setState((state) => {return {...state,counter: state.counter + 1,};});};return (<div className="card flex flex-col items-center"><buttonclassName="btn btn-primary w-1/2 text-xl"onClick={handleClick}>count is {count}</button><p>Edit <code>src/App.tsx</code> and save to test HMR</p></div>);}; -
Index.tsxで<CounterWithStore />をインポートする。 -
Todoルートに遷移後、Indexに戻ってくるとカウントが保持されていることを確認する。
-
src/state/counter.tsでcounterStoreを直接エクスポートする代わりにuseCounterカスタムフックを作成し、エクスポートする。import { Store, useStore } from "@tanstack/react-store";export const counterStore = new Store({counter: 0,});const setCounter = () => {counterStore.setState((store) => {return {...store,counter: store.counter + 1,};});};export const useCounter = (): [number, typeof setCounter] => [useStore(counterStore, (store) => store["counter"]),setCounter,]; -
src/state/counter.tsの状態にmessageとuseMessageを追加する// ...const counterStore = new Store({counter: 0,message: "10未満",});const setCounter = () => {counterStore.setState((store) => {return {...store,counter: store.counter + 1,message: store.counter + 1 >= 10 ? "10以上" : store.message,};});};// ...export const useMessage = () =>useStore(counterStore, (store) => store["message"]); -
<Greeting />コンポーネントで message を表示する -
react-scanを有効にする
-
カウンターをクリックして数字を増やしても、
<Greeting />が再描画されていないことを確認する。 -
10以上になったタイミングで
Greetingが再描画されることを確認する。
他のライブラリで同じことをやる場合
- redux toolkit
- jotai
- zustand
7. サーバーステート
- TanStack Query (a.k.a react-query)
- 下準備:モックサーバーの準備
- json-serverをインストール
pnpm add -D json-serverdb.jsonファイルを作成し、以下の内容を貼り付ける。
{ "todos": [ { "id": "1", "done": false, "title": "やること1", "createdAt": "2024-05-01", "doneAt": null }, { "id": "2", "done": false, "title": "やること2", "createdAt": "2024-06-01", "doneAt": null } ]}- モックサーバーを立ち上げ
npx json-server db.json --watchhttp://localhost:3000にアクセスしてサーバーが動いていることを確認
- 下準備:fetchの追加
src/api/todos.tsファイルを作成し、サーバーにリクエストを投げる関数を追加しておきます。
const SERVER_URL = 'http://localhost:3000/todos';export const get = async () => { const response = await fetch(SERVER_URL); if (!response.ok) { throw new Error(response.statusText); } return response.json();}
const patch = async (data: { id: string; done: boolean }) => {const res = await fetch(`${SERVER_URL}/${data.id}`, { method: 'PATCH', body: JSON.stringify(data), headers: { 'Content-Type': 'application/json', }, });
if (!res.ok) { throw new Error(res.statusText); }
return res.json();};
const post = async (data: { title: string }) => { const response = await fetch(SERVER_URL, { method: 'POST', body: JSON.stringify(data), headers: { 'Content-Type': 'application/json', }, });
if (!response.ok) { throw new Error(response.statusText); }
return response.json();};- tanstack-queryをインストール
pnpm add @tanstack/react-query @tanstack/react-query-devtools- 公式からeslintのルールが提供されているので必要に応じて入れる
https://tanstack.com/query/latest/docs/eslint/eslint-plugin-query
<App />コンポーネントにQueryClientProviderを追加する
import { QueryClient, QueryClientProvider } from '@tanstack/react-query';// ...
const client = new QueryClient();
function App() { return ( <QueryClientProvider client={client}> // ... </QueryClientProvider> );}src/components/Todos.tsxを作成し、モックサーバーからデータを取得する
import { get } from '../api/todos';import { useQuery } from "@tanstack/react-query";
export const Todos = () => {
const {data, isPending, error} = useQuery({ queryKey: ['todos'], queryFn: get,})
if (isPending) { return <div>Loading ...</div>;}
if (error) { return <div>Error</div>;}
console.log('----- data', data);
}-
Todosコンポーネントをsrc/routes/todos.tsxで表示する -
src/api/todos.tsファイルにカスタムフックuseGetTodosを追加する
import { useQuery } from '@tanstack/react-query';
// ...
type Todo = {id: number;title: string;done: boolean;};
const queryKey = ['todos'];
export const useGetTodos = () => {return useQuery<Todo[]>({ queryKey, queryFn: get, });};<Todos />コンポーネントのデータ取得処理をuseGetTodosフックで置き換える
import { get useGetTodos } from '../api/todos';import { useQuery } from "@tanstack/react-query";// ...
export const Todos = () => {
// ...
const {data, isPending, error} = useQuery({ queryKey: ['todos'], queryFn: get,})const { data, isPending, error } = useGetTodos();
// ...
}src/api/todos.tsファイルにカスタムフックusePatchTodoを作る
import { useQuery, useQueryClient, useMutation } from '@tanstack/react-query';
// ...
export const usePatchTodo = () => {const queryClient = useQueryClient();return useMutation({ mutationFn: patch, onSuccess: () => queryClient.invalidateQueries({ queryKey }), });};Todosコンポーネントで、チェックボックスのオンオフでデータを更新する
import { ChangeEvent } from 'react';import { useGetTodos, usePatchTodo } from '../api/todos';//...
const { mutate } = usePatchTodo();
const handleChange = (e: ChangeEvent<HTMLInputElement>) => { const id = e.target.value; mutate({ id, done: e.target.checked });};
// ...
return ( <div className="max-w-2xl mx-auto p-4"> <h1 className="text-3xl font-bold mb-6 text-center">Todo List</h1> <ul className="space-y-3"> {data?.map(({ id, title, done }) => ( <li key={id} className="flex items-center p-3 rounded-lg shadow-sm hover:shadow-md transition-shadow bg-secondary" > <input type="checkbox" id={`${id}`} value={id} checked={done ? true : false} onChange={handleChange} className="w-5 h-5 mr-4 cursor-pointer" /> <label htmlFor={`${id}`} className={`flex-1 text-lg ${done ? "line-through text-gray-400" : " text-neutral"}`} > {title} </label> </li> ))} </ul> </div> );補足
QueryKeysとQueryFnはQueryOptionとしてあらかじめ定義できる
import { queryOptions } from '@tanstack/react-query'
const groupOptions = (id: number) => queryOptions({ queryKey: ['groups', id], queryFn: () => fetchGroups(id), staleTime: 5 * 1000,});
// usage:useQuery(groupOptions(1))useSuspenseQuery(groupOptions(5))useQueries({ queries: [groupOptions(1), groupOptions(2)],})queryClient.prefetchQuery(groupOptions(23))queryClient.setQueryData(groupOptions(42).queryKey, newGroups)TanStack Routerを使っている場合は、コンポーネントのデータ取得処理を行わず、ルートの loader を使うのがおすすめ
8. フォーム
- TanStack Form
- React Hook Form
-
react-hook-formをインストールする
pnpm add react-hook-form -
Todoを新規登録するためのAPI呼び出しを
src/api/todosにusePostTodoフックとして追加するexport const usePostTodo = () => {const queryClient = useQueryClient();return useMutation({mutationFn: post,onSuccess: () => queryClient.invalidateQueries({ queryKey }),});}; -
componentsディレクトリに
TodoForm.tsxを新たに作成するimport { useForm, type SubmitHandler } from 'react-hook-form';import { usePostTodo } from '../api/todos';type FormData = {title: string;};export const TodoForm = () => {const {register,handleSubmit,reset,formState: { errors },} = useForm<FormData>();const { mutate } = usePostTodo();const submitForm: SubmitHandler<FormData> = (data) => {if (!data.title) return;mutate({ title: data.title }, { onSuccess: () => reset() });};return (<form onSubmit={handleSubmit(submitForm)} className="m-5">{errors.title && <p>タイトルを入力してください</p>}<input type="text" {...register('title', { required: 'true' })} className="border-primary mr-2 border" /><button className="btn btn-primary btn-sm">追加</button></form>);}; -
pages/Todos.tsxでTodoForm.tsxをインポートする
入力値のチェック
registerのオプションを使うuseFormのオプションにresolverを渡す- https://react-hook-form.com/docs/useform#resolver
- zodなど外部のバリデーションライブラリを使う場合はこちら
9. 関連ライブラリ、SaaSなど
フレームワーク
- Next.js
- Remix
- Tanstack Start
- Astro
ドラッグアンドドロップ
- Pragmatic drag and drop
- FormKit’s Drag and Drop
- dnd-kit
- hello-pangea/dnd
認証
- SaaS
- Auth0
- AWS Cognito
- GCP Identity Platform
- Clerk
- ライブラリ
- Auth.js
- Better Auth
- Supertokens
- Keycloak
- Hanko
多言語化
- Paraglide
- i18next
- lingui
バリデーション
- ArkType
- zod
- valibot
- yup
className操作
- classnames
- tailwind-merge
日付処理
- date-fns
- luxon
アイコン
- react-icons
グラフ描画
- Apache ECharts
- nivo
- Chart.js
- visx
- Recharts
- Plot
metaタグ書き換え
- react-helmet-async
- React@19で標準機能になります
WiSYWIGエディタ
- Tiptap
- lexical
- Slate
ウィンドウ化・バーチャライゼーション
-
virtua
-
react-virtuoso
-
TanStack Virtual
10. ユニットテスト
- react-test-renderer
- @testing-library/react
- jsdom
- Playwright Components Test
- Vitest Browser Mode
- ヘッドレスブラウザ
- https://vitest.dev/guide/browser.html
- Safetest
- ヘッドレスブラウザ (Playwright)
- https://github.com/kolodny/safetest
-
playwrightをインストール
pnpm create playwright@latest --ct -
playwright-ct.config.jsの内容を下記に変更// @ts-checkimport { defineConfig, devices } from '@playwright/experimental-ct-react';/*** @see https://playwright.dev/docs/test-configuration*/export default defineConfig({testDir: './',/* The base directory, relative to the config file, for snapshot files created with toMatchSnapshot and toHaveScreenshot. */snapshotDir: './__snapshots__',/* Maximum time one test can run for. */timeout: 10 * 1000,/* Run tests in files in parallel */fullyParallel: true,/* Fail the build on CI if you accidentally left test.only in the source code. */forbidOnly: !!process.env.CI,/* Retry on CI only */retries: process.env.CI ? 2 : 0,/* Opt out of parallel tests on CI. */workers: process.env.CI ? 1 : undefined,/* Reporter to use. See https://playwright.dev/docs/test-reporters */reporter: 'list',/* Shared settings for all the projects below. See https://playwright.dev/docs/api/class-testoptions. */use: {/* Collect trace when retrying the failed test. See https://playwright.dev/docs/trace-viewer */trace: 'on-first-retry',/* Port to use for Playwright component endpoint. */ctPort: 3100,},/* Configure projects for major browsers */projects: [{name: 'chromium',use: { ...devices['Desktop Chrome'], colorScheme: 'dark' },},{name: 'firefox',use: { ...devices['Desktop Firefox'], colorScheme: 'dark' },},{name: 'webkit',use: { ...devices['Desktop Safari'], colorScheme: 'dark' },},],}); -
/playwright/index.tsxにスタイルシートのインポートを追加import '../src/index.css';import '../src/App.css'; -
/src/App.spec.tsxを作成import { test, expect } from '@playwright/experimental-ct-react';import App from './App';test.use({ viewport: { width: 500, height: 500 } });test.beforeEach(async ({ page }) => {await page.clock.setFixedTime('2024-01-01');});test('should work', async ({ mount }) => {const component = await mount(<App />);await expect(component).toContainText('こんにちは React');await expect(component).toHaveScreenshot();}); -
テストを実行
pnpm test-ct- 初回はスクリーンショットがないため失敗します
- 2回目の実行でテストが成功します
__snapshots__ディレクトリの下にコンポーネントのキャプチャ画像が格納されています