Astro v6入門
2024-2026 Shunsuke Watanabe
このチュートリアルについて
このチュートリアルは Astro v6 を静的サイトジェネレータとして使う方法に触れてもらうことを目的としています。SSRやServer Islandsは扱いません。
Astroは様々なサイトで利用されているコンテンツ志向のフレームワークです。
discord → https://discord.gg/3havwjWGsw
bluesky → https://bsky.app/profile/craftgear.bsky.social
📝 blog → https://craftgear.github.io/posts/
1. プロジェクト初期化
-
Astro v6 は Node.js 22 以上が前提
node -vで確認する
-
npm create astro@latest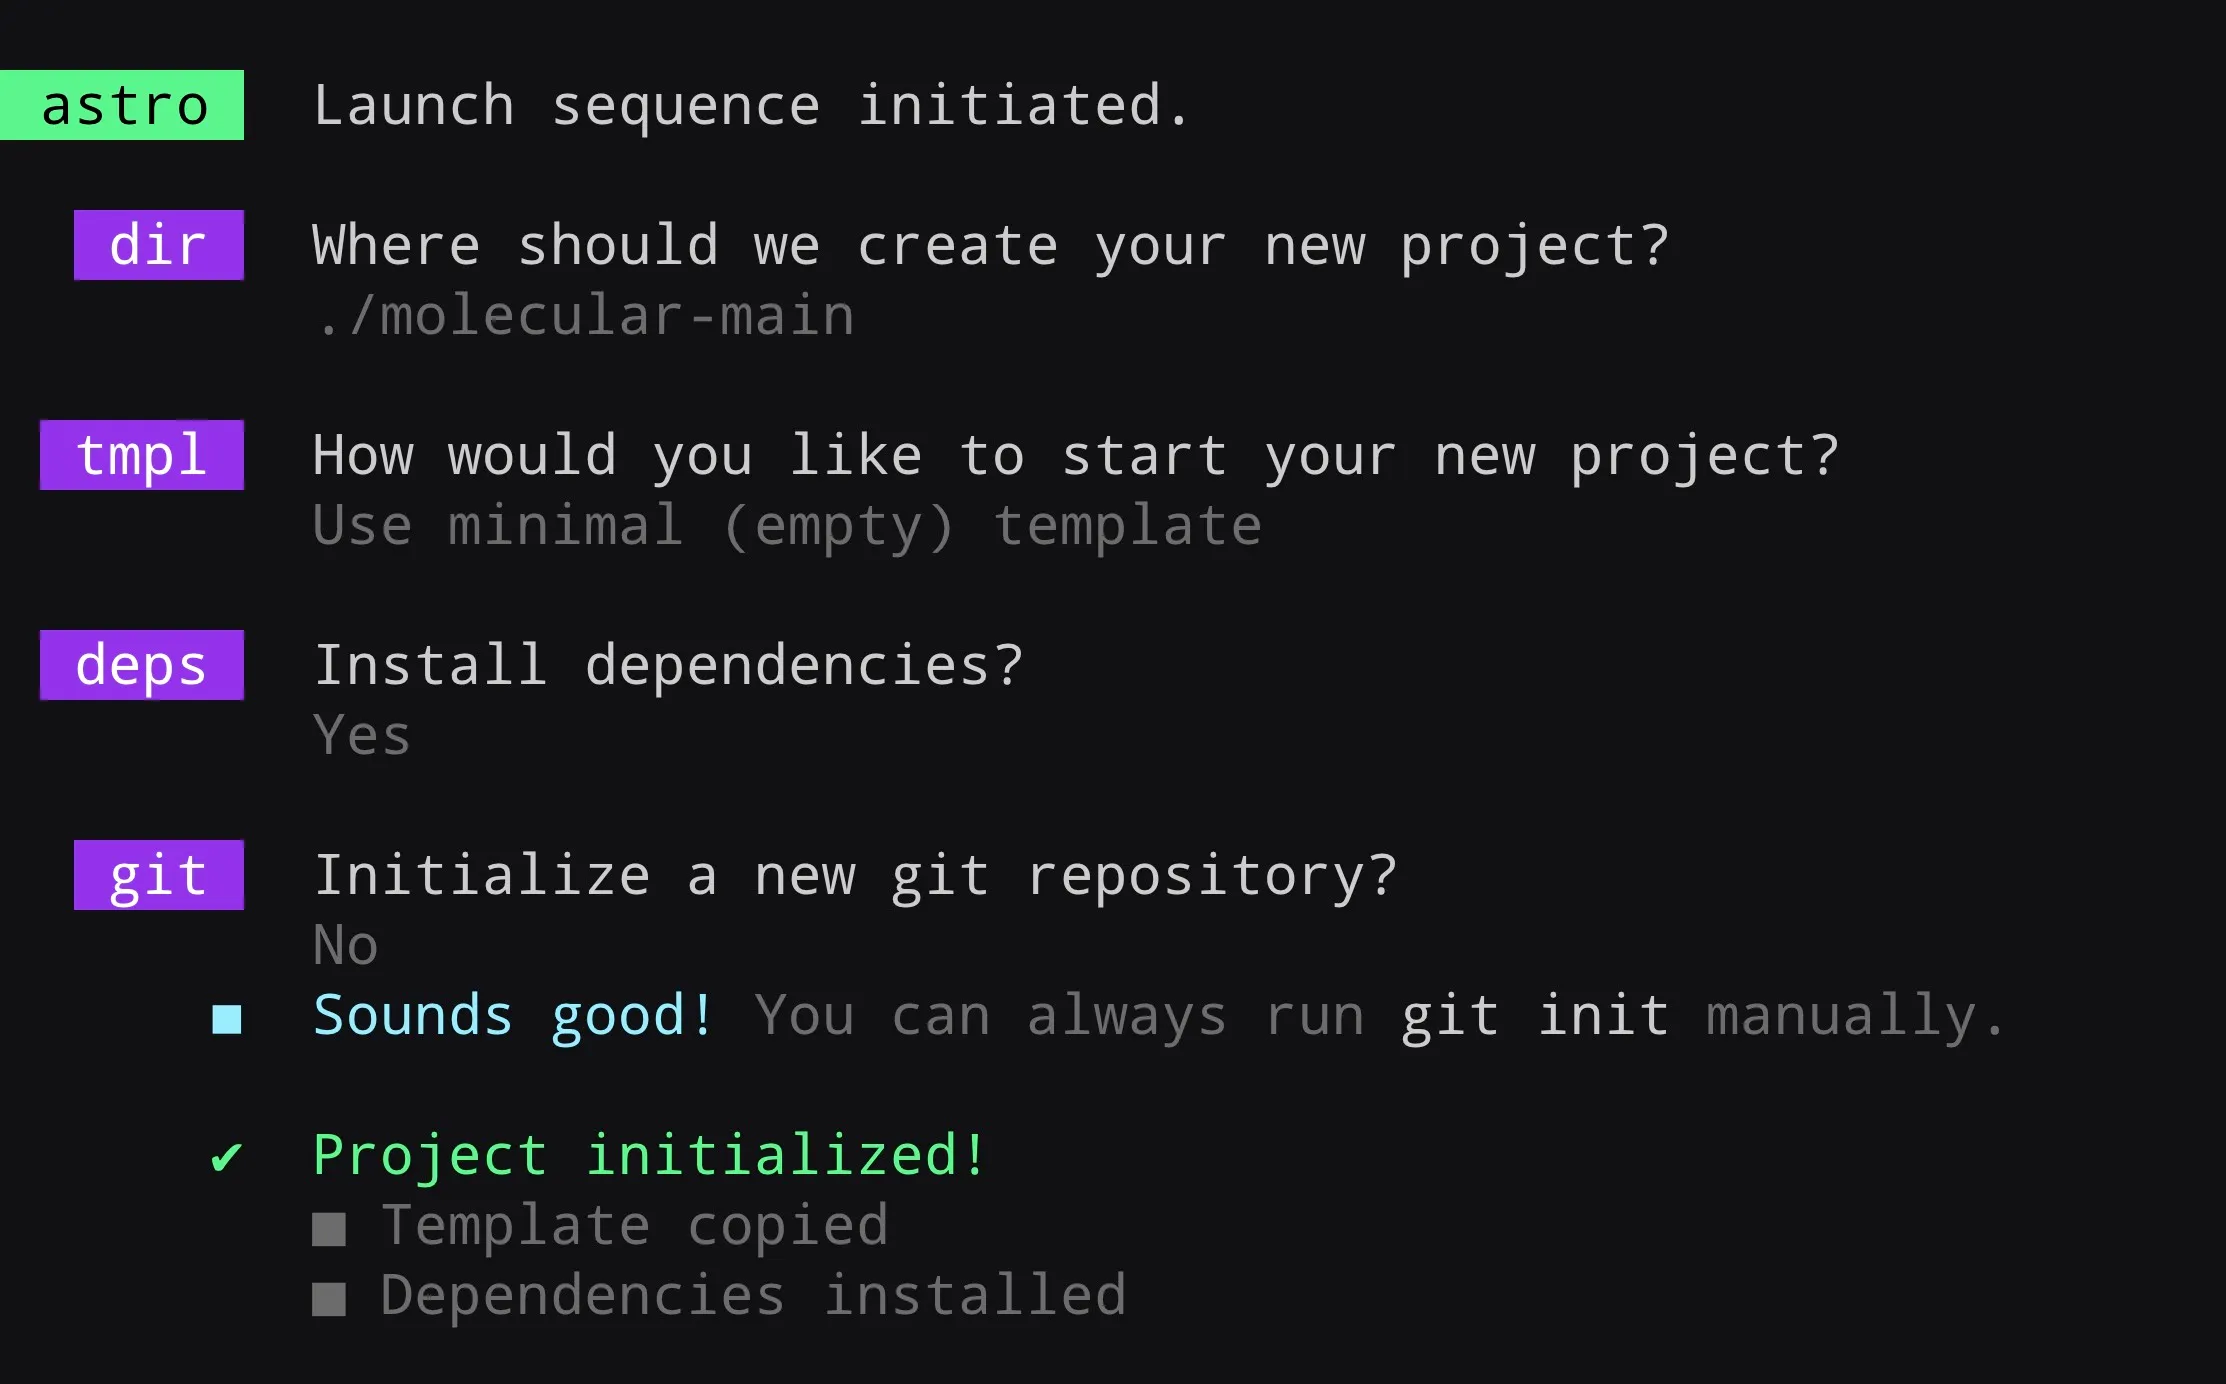
-
作成したプロジェクトディレクトリに入り、
npm i --save-dev prettier prettier-plugin-astro -
.prettierrc.jsonを作成{"semi": false,"singleQuote": true,"plugins": ["prettier-plugin-astro"],"overrides": [{"files": "*.astro","options": {"parser": "astro"}}]}
ディレクトリ構成
— astro_tutorial // 上で指定した任意のプロジェクト名├── public/│ └── favicon.svg├── src/│ └── pages/│ └── index.astro├── astro.config.mjs├── package.json├── README.md└── tsconfig.jsonパスエイリアスの設定
-
tsconfig.jsonにパスエイリアスを追加{"extends": "astro/tsconfigs/strict","include": [".astro/types.d.ts","**/*"],"exclude": ["dist"],"compilerOptions": {"baseUrl": ".","paths": {"@/*": [ "./src/*" ]}}}
tailwindcssのインストール
-
npx astro add tailwind
-
astro addコマンドを使うと、ライブラリだけでなく必要な設定もまとめて追加できる -
共通のスタイルは
src/styles/global.cssに置いておくと扱いやすい
tailwindcssのプラグインを追加
-
typographyとdaisyUIをインストール
npm i -D @tailwindcss/typography daisyui@latest -
global.cssでtypographyとdaisyUIをインポート@import 'tailwindcss';@plugin 'daisyui';@plugin '@/tailwindcss/typography';
開発用サーバ起動
npm run dev
HTMLファイル生成
npm run build
2. ページ作成
ファイルベースルーティング
/src/pages/ディレクトリに対応ファイルを置くとそれが自動的にページになる- 対応ファイル astro/md/mdx/js/ts
- 対応ファイル以外のファイルを置くと警告が出る、アンダースコアをファイル名の先頭につけると警告は出なくなる
/src/pages/400.astro/src/pages/500.astroでカスタムエラーページを作成できる
/src/pages/index.astroファイルをひらいて中身をすべて消し、<h1>Index</h1>を追加する。/src/pages/posts/index.astroファイルを新規作成し、<h1>Posts</h1>を追加する。
リンク
<a>タグを使う/src/pages/ディレクトリがサイトルートになるので、/src/pages/hoge.astroへのリンクは<a href="/hoge">となる
-
/src/pages/index.astroから/src/pages/posts/index.astroにリンクを作成する<h1>Index</h1><a href="posts"> posts </a>
レイアウト & Slot
- 複数のページで同じページレイアウトを使う場合は、レイアウトファイルにまとめることができる
- レイアウトファイルの置き場所はどこでも良いが、
/src/layoutsディレクトリに置く事が多い - コンポーネントの子要素は
<slot />タグのある場所に挿入される- Reactの
childrenは無い - Slotには名前をつけることができる。たとえば
<slot name="hoge" />は子要素のうちslot="hoge"属性を持つもののみを表示する
- Reactの
-
/src/layouts/Base.astroを作成する---import '@/styles/global.css'---<html lang="ja"><head><meta charset="utf-8" /><link rel="icon" type="image/svg+xml" href="/favicon.svg" /><meta name="viewport" content="width=device-width" /><meta name="generator" content={Astro.generator} /><title>Astro</title></head><bodyclass="prose flex min-h-screen max-w-full flex-col bg-slate-50 text-slate-900 dark:bg-slate-950 dark:text-slate-100"><navclass="flex justify-center gap-4 bg-white/90 py-4 backdrop-blur-sm dark:bg-slate-950/90"><ahref="/"class="active:scale-98 rounded-lg px-4 py-2 font-medium text-slate-900 no-underline transition-all hover:bg-indigo-100 hover:text-indigo-700 dark:text-slate-100 dark:hover:bg-indigo-800/20 dark:hover:text-indigo-300">Top</a><ahref="/posts"class="active:scale-98 rounded-lg px-4 py-2 font-medium text-slate-900 no-underline transition-all hover:bg-indigo-200 hover:text-indigo-800 dark:text-slate-100 dark:hover:bg-indigo-800/30 dark:hover:text-indigo-400">Posts</a></nav><main class="mx-auto my-8 w-full max-w-[1200px] flex-1 px-4 flex flex-col items-center"><slot /></main></body></html> -
/src/pages/index.astroでこのレイアウトを利用する---import Base from '@/layout/Base.astro'---<Base><h1>Index</h1><a href="posts"> posts </a></Base> -
/src/pages/posts/index.astroも同様にBaseを導入する
ダイナミックルート
- 一つのAstroページから複数のHTMLを生成するのに使う
- ファイル名に大カッコでくくった文字列を使うとその部分がパラメータになる
/src/pages/posts/[slug].astroconst { slug } = Astro.params
[...slug].astroのようにするとパス区切りを無視してすべてのパスを受け取れるgetStaticPaths関数でパラメータにいれる値を配列で返すと、そのパラメータの名前のHTMLファイルが生成される
/src/pages/posts/[slug].astroを作成し、post-1 と post-2 という2つのファイルを生成する
-
getStaticPathsで返す値の
slugに設定した値でファイル名の[slug]が置き換えられるので、以下の例ではpost-1.htmlとpost-2.htmlという2つのファイルが生成される---import Base from '@/layout/Base.astro'export const getStaticPaths = () => {return [{ params: { slug: 'post-1' } }, // slugに設定した値でファイル名の [slug] が置き換えられる{ params: { slug: 'post-2' } },]}const { slug } = Astro.params---<Base><h1>{slug}</h1></Base>
http://localhost:4321/posts/post-1にアクセスし、ページが生成されていることを確認する
Transition
- ページ切り替えを滑らかにしたいときは、
ClientRouterが使える - ただし必須ではなく、必要なページだけで有効にすればよい
- 対応状況はブラウザに依存するので、使う前に確認しておく
- https://docs.astro.build/en/guides/view-transitions/
- 2026年3月現在主要ブラウザの最新版はすべて対応済み
-
/src/layouts/Base.astroにClientRouterを追加する---import '@/styles/global.css'import { ClientRouter } from 'astro:transitions'---<html lang="jp"><head>...<ClientRouter fallback="none" /></head><body>...<mainclass="mx-auto my-8 w-full max-w-[1200px] flex-1 px-4 flex flex-col items-center"transition:animate="slide">...</main></body></html>
3. Astroコンポーネント
Reactとの違い
- 関数ではなくてテキストファイル
- 拡張子が
astro - import時に拡張子まで含める
- 親要素を一つにしなくていい
- 複数のHTMLタグを並べて書ける
<style>タグ、<script>タグが直に書ける- classNameではなくclass
- コンポーネントスクリプトがある
コンポーネントスクリプト
- ファイル冒頭の
ーーーで囲まれた部分- markdownではfront matterと呼ばれる部分
- AstroがHTMLを生成する際に実行するjavascriptを書く場所
- ビルドしたあとはすべて消える
コンポーネントテンプレート
- HTML部分のこと
- コンポーネントスクリプトで定義した変数は
{hoge}のようにして参照できる - ただし関数は波括弧で展開できない、イベントハンドラの割当は
<script>タグ内に書く必要がある - フラグメントは
<Fragmnet></Fragment>or<></>
Props
- コンポーネントスクリプト内で
Props型を定義すると自動的にコンポーネントのプロパティ定義になるtype Props = { hoge: string; };
- プロパティは
Astro.propsから読み出すconst { hoge } = Astro.props;
ナビゲーションをコンポーネントに切り出す
-
src/components/Header.astroファイルを作成し、src/layouts/Base.astroからヘッダ部分を切り出す------<nav class="flex justify-center gap-4 bg-white/90 py-4 backdrop-blur-sm dark:bg-slate-950/90"><ahref="/"class="active:scale-98 rounded-lg px-4 py-2 font-medium text-slate-900 no-underline transition-all hover:bg-indigo-100 hover:text-indigo-700 dark:text-slate-100 dark:hover:bg-indigo-800/20 dark:hover:text-indigo-300">Top</a><ahref="/posts"class="active:scale-98 rounded-lg px-4 py-2 font-medium text-slate-900 no-underline transition-all hover:bg-indigo-200 hover:text-indigo-800 dark:text-slate-100 dark:hover:bg-indigo-800/30 dark:hover:text-indigo-400">Posts</a></nav> -
HeaderコンポーネントをBaseレイアウトでインポートして表示する
---import { ClientRouter } from 'astro:transitions'import Header from '@/components/Header.astro'---<html lang="jp" class="h-full">...<body><Header /><main class="mx-auto my-8 max-w-[1200px] px-4" transition:animate="slide"><slot /></main></body></html>
スタイル
- 共通の見た目は cssファイルにまとめる
- 個別の見た目は
<style>タグをコンポーネントに書く
CSSファイルとstyle タグでスタイルを変更する
-
src/pages/Index.astroを開き、<span>style this</span>を追加する -
src/styles/global.cssファイルに共通スタイルを追加する@import 'tailwindcss';@plugin 'daisyui';@plugin '@/tailwindcss/typography';span {color: var(--color-orange-300);}a {text-decoration-line: none !important;}a:hover {color: var(--color-accent);} -
style thisの文字色と、navのホバー時の文字色が変わっていることを確認する
-
src/pages/Index.astroに以下のスタイルを追加する---import Base from '../layouts/Base.astro'---<style>span {color: var(--color-green-300);}</style><Base><h1>Index Page</h1><span>style this</span><a href="posts/">Posts</a></Base> -
サーバーを再起動する
-
文字色が緑に変わるのを確認する
使い分け
<style>タグは、そのコンポーネントだけに効くglobal.cssは、複数のページやコンポーネントで共通に使いたいとき
SVGコンポーネント
SVG はそのままコンポーネントとして import できる。
-
src/assets/astro.svgというファイルを作成し、以下の内容で置き換える<svg xmlns="http://www.w3.org/2000/svg" fill="none" viewBox="0 0 128 128"><g><path d="M47.7 107.1c-5.5-5-7.2-15.7-4.9-23.4 4 4.9 9.6 6.4 15.4 7.3 8.9 1.3 17.6.8 25.9-3.2l2.8-1.7a18 18 0 0 1-7.2 20l-5.5 3.8c-5.6 3.8-7.2 8.2-5 14.7l.2.7a14 14 0 0 1-6.6-5.6 15.8 15.8 0 0 1-2.6-8.6c0-1.5 0-3-.2-4.5-.5-3.7-2.2-5.3-5.5-5.4-3.3-.1-5.9 2-6.6 5.2l-.2.7Z"/><path d="M16 82.4s16.5-8 33-8l12.4-38.3c.5-2 1.8-3.2 3.3-3.2 1.6 0 3 1.3 3.4 3.2l12.4 38.3c19.6 0 33 8 33 8l-28-76c-.8-2.3-2.2-3.7-4-3.7H48c-1.8 0-3.1 1.4-4 3.7l-28 76Z"/></g><path fill="url(#a)" d="M47.7 107.1c-5.5-5-7.2-15.7-4.9-23.4 4 4.9 9.6 6.4 15.4 7.3 8.9 1.3 17.6.8 25.9-3.2l2.8-1.7a18 18 0 0 1-7.2 20l-5.5 3.8c-5.6 3.8-7.2 8.2-5 14.7l.2.7a14 14 0 0 1-6.6-5.6 15.8 15.8 0 0 1-2.6-8.6c0-1.5 0-3-.2-4.5-.5-3.7-2.2-5.3-5.5-5.4-3.3-.1-5.9 2-6.6 5.2l-.2.7Z"/><defs><linearGradient id="a" x1="64.7" x2="77.4" y1="119.2" y2="77.4" gradientUnits="userSpaceOnUse"><stop stop-color="#D83333"/><stop offset="1" stop-color="#F041FF"/></linearGradient></defs><style>g {fill: #000;}@media (prefers-color-scheme: dark) {g {fill: #FFF;}}</style></svg> -
src/components/Footer.astroを作成する---import AstroIcon from '@/assets/astro.svg'---<footer class="p-8 w-full flex justify-center items-center gap-1">powered by <AstroIcon width={36} /></footer> -
Footer.astroを Baseレイアウトで表示する
補足: <style> <script> タグにコンポーネントスクリプトで定義した変数を渡す方法
https://docs.astro.build/en/reference/directives-reference/#definevars
https://docs.astro.build/en/guides/client-side-scripts/
4. Content Layer API
4.0 まで markdown → Content Collection → HTML
5.0 以降 データソース → Content Layer → Content Collection → HTML
markdown が データソース & Content Layer に変わることで様々な種類のデータをもとにコンテンツを生成できるようになった。
Content collections
- 同じ構造のデータをまとめて扱うための仕組み
- ローカルファイル(markdown/mdx/json)
- データソースから取得したデータをキャッシュする
- Content Loader API を使うと、markdown 以外のデータからも collection を作成できる
- API (外部Webサービス/CMS)
- データベース
- csv等のファイル
- collection の定義は
src/content.config.tsに書く必要がある
collectionの定義
-
データソースの markdown ファイルをプロジェクトルートに解凍する
-
src/content.config.tsファイルを新規作成する -
collection の定義を書く
import { defineCollection } from 'astro:content'import { z } from 'astro/zod'const posts = defineCollection({})export const collections = { posts } -
loader を追加する
import { defineCollection } from 'astro:content'import { z } from 'astro/zod'import { glob } from 'astro/loaders'const posts = defineCollection({loader: glob({ pattern: '**/*.md', base: 'src/../blog_examples' }),})export const collections = { posts } -
schema を追加する
import { defineCollection } from 'astro:content'import { z } from 'astro/zod'import { glob } from 'astro/loaders'const posts = defineCollection({loader: glob({ pattern: '**/*.{md,mdx}', base: 'src/../blog_examples' }),schema: z.object({title: z.string(),pubDate: z.coerce.date(),description: z.string(),heroImage: z.string(),}),})export const collections = { posts } -
npx astro syncを実行するastro devやastro buildの前に、手元の型情報をそろえたいときの補助として使う
Content Collectionからページを生成
-
src/pages/posts/[slug].astroでpostscollection を読み込み、各記事ごとのHTMLを生成する---import Base from '@/layouts/Base.astro'import { type CollectionEntry, getCollection, render } from 'astro:content'export const getStaticPaths = async () => {const posts = await getCollection('posts')return posts.map((post) => {return {params: { slug: post.id },props: post,}})}type Props = CollectionEntry<'posts'>const post = Astro.propsconst { Content } = await render(post)---<Base><Content /></Base> -
サーバーを再起動する
-
src/pages/posts/index.astroで記事一覧を表示する---import Base from '@/layouts/Base.astro'import { Image } from 'astro:assets'import { getCollection } from 'astro:content'import aboutImage from '../../../blog_examples/imgs/blog-placeholder-about.jpg'const posts = (await getCollection('posts')).sort((a, b) => b.data.pubDate.valueOf() - a.data.pubDate.valueOf(),)---<Base><section><ul class="flex flex-wrap justify-center gap-4 m-0 p-0">{posts.map((post) => (<li class="first:w-full first:flex first:flex-col first:items-center w-[calc(50%-2rem)]"><a href={`/posts/${post.id}/`}><Imagewidth={720}height={360}src={aboutImage}alt="post title image"/><h4 class="title">{post.data.title}</h4><p class="date">{post.data.pubDate.toLocaleString()}</p></a></li>))}</ul></section></Base>
補足:レンダリングされたマークダウンのスタイル適用
-
<style>タグを追加してもマークダウン表示コンポーネント(<Content />) には適用されない。<style is:global>にするとマークダウン以外の場所のスタイルも変わってしまう
-
cssファイルを作ってインポートする
-
src/pages/posts/_post.cssファイルを作成するh1 {font-size: xxx-large !important;color: coral;} -
src/pages/posts/[slug].astroで_post.cssをインポートする -
http://localhost:4322/posts/markdown-style-guide/ を開きH4だけ色と大きさが変わっていることを確認する
-
-
上記の例とは別に スタイル適用のためのコンポーネントを噛ませる方法もある https://docs.astro.build/ja/recipes/tailwind-rendered-markdown/#recipe
5. Community loaders
https://astro.build/integrations/?search=&categories[]=loaders
2025.03.21 feed loaderのv6対応待ち、この章は飛ばす
Feed loader
- 4章で作った
postsはそのままにして、src/content.config.tsに RSS の内容をnewsとして足す
-
npm i @ascorbic/feed-loader -
src/content.config.tsにコレクションを追加import { defineCollection } from 'astro:content'import { z } from 'astro/zod'import { glob } from 'astro/loaders'import { feedLoader } from '@/ascorbic/feed-loader'const posts = defineCollection({loader: glob({ pattern: '**/*.{md,mdx}', base: 'src/../blog_examples' }),schema: z.object({title: z.string(),pubDate: z.coerce.date(),description: z.string(),heroImage: z.string(),}),})const news = defineCollection({loader: feedLoader({url: 'https://news.yahoo.co.jp/rss/categories/domestic.xml',}),schema: z.object({title: z.string(),pubdate: z.coerce.date(),link: z.string(),}),})export const collections = { posts, news } -
サーバーを再起動
-
src/pages/news.astroファイルを作成---import { getCollection } from 'astro:content'import Base from '@/layouts/Base.astro'const news = await getCollection('news')---<Base><ul class="flex flex-col items-center space-y-2 m-auto list-none">{news.map((x) => (<li class="w-full hover:bg-base-200"><a href={x.data.link} class="px-4 py-4 flex items-center"><div class="text-2xl font-bold text-right">{x.data.pubdate?.toLocaleString().slice(-8, -3)}</div><div class="text-2xl text-left ml-4 pl-4 border-l-2border-base-content hover:border-accent ">{x.data.title}</div></a></li>))}</ul></Base>
6. 独自 Loaderの作成
Loaderには2形式ある
- Inline Loader - まず試したいときに向く
- Object Loader - 処理を分けて育てたいときに向く
どちらも build-time の loader で、外部データをビルド時に collection へ取り込むためのもの。
独自ローダーとして Wikipedia で昨日最も読まれた記事を取得する
https://api.wikimedia.org/wiki/Feed_API/Reference/Featured_content
Inline Loader の作成
-
src/content.config.tsに新しい content collection を追加するimport { defineCollection } from 'astro:content'import { z } from 'astro/zod'...const wikipedia = defineCollection({loader: async () => {},schema: z.object({}),})... -
loader 関数を作成する
...type Mostread = {pageid: number}const wikipedia = defineCollection({loader: async () => {const [y, mm, dd] = yesterdayYMD()const res = await fetch(`https://api.wikimedia.org/feed/v1/wikipedia/ja/featured/${y}/${mm}/${dd}`,)const json = await res.json()return json.mostread.articles.map((x: Mostread) => ({id: `${x.pageid}`,...x,}))},schema: z.object({}),})...-
loader関数で返す配列の要素には必ず
idプロパティが必要 -
前日の日付を返す関数を
src/utils/date.tsに作成し、export const yesterdayYMD = () => {const date = new Date()const yesterday = date.setDate(date.getDate() - 1)const [y, m, d] = new Date(yesterday).toLocaleString().split(' ')[0].split('/')const mm = `0${m}`.slice(-2)const dd = `0${d}`.slice(-2)return [y, mm, dd]}content.config.tsでインポートする...import { yesterdayYMD } from '@/utils/date'...
-
-
schema を作成する
type Mostread = {pageid: number}const wikipedia = defineCollection({loader: async () => {const [y, mm, dd] = yesterdayYMD()const res = await fetch(`https://api.wikimedia.org/feed/v1/wikipedia/ja/featured/${y}/${mm}/${dd}`,)const json = await res.json()return json.mostread.articles.map((x: Mostread) => ({id: `${x.pageid}`,...x,}))},schema: z.object({views: z.number(),rank: z.number(),type: z.string(),titles: z.object({canonical: z.string(),display: z.string(),}),thumbnail: z.object({source: z.string(),width: z.number(),height: z.number(),}).optional(),description: z.string().optional(),content_urls: z.object({desktop: z.object({page: z.string(),}),}),extract: z.string(),}),}) -
作成した content collection をエクスポートする
...export const collections = { posts, news, wikipedia } -
src/pages/wikipedia.astroを作成する---import { type CollectionEntry, getCollection } from 'astro:content'import { Picture } from 'astro:assets'import Base from '@/layouts/Base.astro'import { yesterdayYMD } from '@/utils/date'type Item = CollectionEntry<'wikipedia'>const wikipedia = await getCollection('wikipedia')---<Base><div class="flex flex-col items-center"><h1 class="mb-8 text-xl">Wikipediaで{yesterdayYMD().join('/')}に最も読まれた日本語記事</h1><div class="grid w-3/4 gap-8">{wikipedia.map((x: Item, i: number) => {return (<div class="card-side flex rounded-lg bg-base-300 shadow-xl"><ahref={x.data.content_urls.desktop.page}class="card-body justify-center text-base-content"><div class="flex gap-8"><span class="break-keep text-center font-serif text-4xl">{i + 1}</span><div class="flex flex-col gap-4"><div class="flex flex-row items-center justify-start gap-1"><div class="card-title mr-4 text-3xl">{x.data.titles.canonical}</div><svgxmlns="http://www.w3.org/2000/svg"width="20"height="20"viewBox="0 0 24 24"><pathfill="currentColor"d="M12 6.5A9.77 9.77 0 0 0 3.18 12c1.65 3.37 5.02 5.5 8.82 5.5s7.17-2.13 8.82-5.5A9.77 9.77 0 0 0 12 6.5m0 10c-2.48 0-4.5-2.02-4.5-4.5S9.52 7.5 12 7.5s4.5 2.02 4.5 4.5s-2.02 4.5-4.5 4.5"opacity=".3"/><pathfill="currentColor"d="M12 4.5C7 4.5 2.73 7.61 1 12c1.73 4.39 6 7.5 11 7.5s9.27-3.11 11-7.5c-1.73-4.39-6-7.5-11-7.5m0 13A9.77 9.77 0 0 1 3.18 12C4.83 8.63 8.21 6.5 12 6.5s7.17 2.13 8.82 5.5A9.77 9.77 0 0 1 12 17.5m0-10c-2.48 0-4.5 2.02-4.5 4.5s2.02 4.5 4.5 4.5s4.5-2.02 4.5-4.5s-2.02-4.5-4.5-4.5m0 7a2.5 2.5 0 0 1 0-5a2.5 2.5 0 0 1 0 5"/></svg><div>{x.data.views.toLocaleString()}</div></div><p>{x.data.extract}</p></div></div></a><div class="flex h-full flex-col justify-center bg-transparent">{x.data.thumbnail && (<Pictureclass="max-w-64 object-cover"width={x.data.thumbnail.width}height={x.data.thumbnail.height}src={x.data.thumbnail?.source}alt={x.data.titles.canonical}/>)}</div></div>)})}</div></div></Base> -
サーバーを再起動する
2. Object Loader の作成
- Inline Loader は手軽だが、collection が増えると
src/content.config.tsが読みづらくなる - Object Loader にすると、ローダーのコードを
src/loaders/wikipedia.tsに分けられる - まとまった処理や再利用があるなら Object Loader のほうが扱いやすい
-
src/loaders/wikipedia.tsを作成するimport type { Loader } from 'astro/loaders'export const wikipediaLoader = (): Loader => ({name: 'wikipedia',load: async () => {},schema: {},})- 5行目:
loader関数ではなくてload関数 - 4行明: Object Loaderには
nameで名前をつけられる
- 5行目:
-
load関数の中身をsrc/content.config.tsから移すimport type { Loader } from 'astro/loaders'import { z } from 'astro/zod'import { yesterdayYMD } from '@/utils/date'type Mostread = {pageid: number;timestamp: string;}export const wikipediaLoader = (): Loader => ({name: 'wikipedia',load: async ({ store, generateDigest }) => {const [y, mm, dd] = yesterdayYMD()const res = await fetch(`https://api.wikimedia.org/feed/v1/wikipedia/ja/featured/${y}/${mm}/${dd}`,)const json = await res.json()store.clear()json.mostread.articles.forEach((x: Mostread) => {store.set({id: `${x.pageid}`,data: x,digest: generateDigest(x.timestamp),})})},schema: {},})load関数では配列を返すのではなく、storeにデータを保存する
-
schema を loader 側へ移す
import type { Loader } from 'astro/loaders'import { z } from 'astro/zod'import { yesterdayYMD } from '@/utils/date'type Mostread = {pageid: number}export const wikipediaLoader = (): Loader => ({name: 'wikipedia',load: async (context) => {const [y, mm, dd] = yesterdayYMD()const res = await fetch(`https://api.wikimedia.org/feed/v1/wikipedia/ja/featured/${y}/${mm}/${dd}`,)const json = await res.json()json.mostread.articles.forEach((x: Mostread) => {context.store.set({ id: `${x.pageid}`, data: x })})},schema: z.object({views: z.number(),rank: z.number(),type: z.string(),titles: z.object({canonical: z.string(),display: z.string(),}),thumbnail: z.object({source: z.string(),width: z.number(),height: z.number(),}).optional(),description: z.string().optional(),content_urls: z.object({desktop: z.object({page: z.string(),}),}),extract: z.string(),}),}) -
src/content.config.tsで作成したローダーを読み込むimport { defineCollection } from 'astro:content'import { z } from 'astro/zod'import { glob } from 'astro/loaders'import { feedLoader } from '@/ascorbic/feed-loader'import { wikipediaLoader } from '@/loaders/wikipedia'...const wikipedia = defineCollection({loader: wikipediaLoader(),})export const collections = { posts, news, wikipedia } -
サーバーを再起動する
7. Client Islands
- ReactなどのUIライブラリのコードをそのまま使うための仕組み
- ページの一部分だけがReact etc. になる
-
Reactインテグレーションを追加する
npx astro add react
-
src/components/Counter.tsxファイルを作成するimport { useState } from 'react'export const Counter = () => {const [count, setCount] = useState(0)const handleClick = () => {setCount(count + 1)}return (<div className="flex space-x-4 items-center"><div className="text-2xl">Count: {count}</div><button type="button" onClick={handleClick} className="btn btn-primary">increment</button></div>)} -
src/pages/index.astroでインポート---import Base from '@/layouts/Base.astro'import { Counter } from '@/components/Counter'---<style>span {color: var(--color-green-300);}</style><Base><h1>Index</h1><Counter /><span>style this</span><a href="posts"> posts </a></Base> -
カウンターが動かないことを確認
-
<Counter/>にclient:load属性を追加する- ページ読み込み後すぐにhydrateされる
---import Base from '@/layouts/Base.astro'import { Counter } from '@/components/Counter'---<style>span {color: var(--color-green-300);}</style><Base><h1>Index</h1><Counter client:load /><span>style this</span><a href="posts"> posts </a></Base> -
カウンターが動くことを確認する
-
その他のハイドレーションディレクティブ
client:idle- すぐに表示しなくてもよいUIに向いている
client:visible- コンポーネントが画面に入ってから動かしたいときに使う
client:only- 最初からクライアントだけで描画したいときに使う
8. デプロイ
自鯖
- まず
npm run devで表示を確認する - まず
npm run buildを実行してdistを作る - できたファイルをサーバーの公開ディレクトリに置く
Github Pages
hoge.github.ioドメインなら、astro.config.mjsのsiteを設定して GitHub Pages 向けの手順を使う- 公式ガイド: https://docs.astro.build/ja/guides/deploy/github/
その他のデプロイ先
astro:env
- 型安全な環境変数を扱いたいときは
astro:envを使う - 参考: https://docs.astro.build/en/guides/environment-variables/#type-safe-environment-variables
9. integrations
https://astro.build/integrations/
主要なもの
- sitemap
- mdx
- tailwindcss
- react
- partytown
- expressiveCode
PartytownをつかってGoogleAnalyticsを導入する
-
Partytown を使うと、外部スクリプトを少し扱いやすくできる
-
npx astro add partytown -
Google Analytics を入れるときの補足として、
src/layouts/Base.astroでタグを読み込む<!-- Google tag (gtag.js) --><script is:inline type="text/partytown" src="https://www.googletagmanager.com/gtag/js?id=ID"></script><script is:inline type="text/partytown">window.dataLayer = window.dataLayer || [];function gtag(){dataLayer.push(arguments);}gtag('js', new Date());gtag('config', 'ID');</script> -
type="text/partytown"をつけると web worker でスクリプトを動かせる -
is:inlineをつけると Astro の最適化対象にせず、そのまま実行する
10. Astro v6 補足
Node.js 22 以上が前提
- 既存プロジェクトを更新するときは、Astroのアップデート前にNode.jsのバージョンも確認しておく
Fonts API
- Astro v6 では Fonts API が追加され、フォントをAstroの設定にまとめて扱いやすくなった
import { defineConfig, fontProviders } from 'astro/config';
export default defineConfig({ fonts: [ { name: 'Roboto', cssVariable: '--font-roboto', provider: fontProviders.fontsource(), }, ],});---import { Font } from 'astro:assets';---
<Font cssVariable="--font-roboto" preload />